How to deploy a simple application to Kubernetes
Now that Kubernetes is up and running, it's time to do something with it. For me, it’s this very blog, which is already running on Kubernetes on my Raspberry Pi as I write this. I’ve tried to do this in the most professional way possible. Not only to learn but also to share with you; let me explain how I deployed this very blog on Kubernetes.
To properly understand the whole process (from building the image to DNS and HTTPS) is a complex endeavour. This is why we will focus first on deploying a very simple website on your local network.
Step 1 : The simplest of apps
To simplify this tutorial, let’s set up the simplest app possible: a single HTML file served with Nginx and built with a Dockerfile.
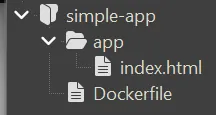
The Dockerfile looks like this:
FROM nginx:alpine
COPY app/ /usr/share/nginx/html/And to make it even simpler, the HTML file isn't even "proper" HTML, but browsers don’t mind. It’s just this:
<h1>Hello from the simplest possible app!</h1>Since the goal is to learn deployment rather than app development, this will allow us to focus on the essentials. You can build and test it locally using the following commands:
docker build -t simple-app .And run it locally to test:
docker run -p 80:80 simple-appOnce running, you can access your website by visiting http://localhost in your browser.
Step 2 : How to push your image to GitHub Container Registry
Great, we have an app; it's time to make it available to our cluster. To do this, Kubernetes needs to pull the image from a registry. There are two options: either you go all in self hosting (with Docker Registry or Zot), or you can use the GitHub Container Registry (GHCR). To make this tutorial more applicable to everyone, let’s use GitHub, but don't hesitate to try and self-host your container as well!
First, you'll need a Personal Access Token (PAT). You can create one on GitHub by going to Settings → Developer settings → Personal access tokens (Tokens classic).
You need these permissions:
write:packagesread:packages
(Quick tip: PATs have an expiration date. If yours expires, Kubernetes will eventually lose the ability to pull your images. I highly recommend setting a reminder in your calendar a few days before it expires so you don't get stuck with a broken deployment later).
Store it in an environment variable:
export GHCR_TOKEN=ghp_xxxxxxxxxxxxxThen, log in to GHCR:
echo $GHCR_TOKEN | docker login ghcr.io -u <YOUR_GITHUB_USERNAME> --password-stdinNow, tag and push your image. Replace <YOUR_GITHUB_USERNAME> with your actual username.
Note the --platform linux/arm64 flag: Raspberry Pi uses an ARM architecture, while most standard PCs and laptops use x86. These are different types of CPU architectures, and since an x86 image won't run on an ARM processor, this option is mandatory when building for the Pi.
docker build --platform linux/arm64 -t ghcr.io/<YOUR_GITHUB_USERNAME>/simple-app:latest .
docker push ghcr.io/<YOUR_GITHUB_USERNAME>/simple-app:latestYou should now see your image in the Packages tab of your GitHub profile.

Step 3 : How to pull your image from GitHub Container Registry
Now that the image is online, Kubernetes needs to pull it. To do this, we need to tell K3s which credentials to use for ghcr.io. On your Pi node, edit the registry configuration:
sudo nano /etc/rancher/k3s/registries.yamlAdd your credentials:
configs:
  "ghcr.io":
    auth:
      username: "<YOUR_GITHUB_USERNAME>"
password: "<YOUR_GITHUB_PAT>"Important: For K3s to pick up these changes, you'll need to restart the service:
sudo systemctl restart k3sStep 4 : How to write a basic Kubernetes YAML configuration
We are now ready to deploy. To achieve this, we'll need to write some YAML to define our desired state. Let's break down the different blocks required for a basic service or website deployment.
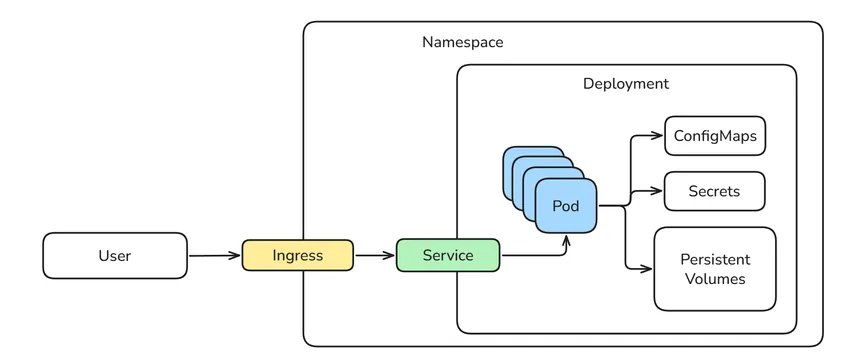
1. The Namespace
The Namespace is the "box" that contains and organizes your applications. By defining kind: Namespace with the name website-namespace, we create a logical boundary. Every other resource in our file then uses metadata.namespace: website-namespace to tie itself to this box.
More generally, this and every other Kubernetes configuration share a few common fields: apiVersion (the version of the K8s API), kind (what we are creating), and metadata (the name of the resource and its namespace).
Here is how the namespace is defined:
apiVersion: v1
kind: Namespace
metadata:
  name: website-namespace
See Kubernetes Namespaces for more
2. The Deployment
The deployment defines the desired state of your application. Like every other resource, it has a name defined in its metadata. For larger apps, you might have multiple deployments in the same namespace, each managing a different part of your system.
Here is how the deployment is defined:
apiVersion: apps/v1
kind: Deployment
metadata:
  name: website
  namespace: website-namespace
spec:
  replicas: 1
  selector:
    matchLabels:
      app: website-pod
  template:
    metadata:
      labels:
        app: website-pod
    spec:
      containers:
        - name: website-app
image: ghcr.io/<YOUR_GITHUB_USERNAME>/simple-app:latestContainers: This section defines the container to run inside the pod and which image to pull from GHCR. It has a name because a single pod can technically run multiple "tightly coupled" containers (e.g., your main app alongside a sidecar for logging or metrics).
Labels: We tag our pods using spec.template.metadata.labels (e.g., app: website-pod). Think of these as metadata tags to identify your resources.
Selectors: The deployment uses spec.selector to find which pods it's responsible for by matching these labels. In our simple case, the selector and the labels match exactly, which might look redundant, but this separation allows for very flexible targeting in larger setups.
Replicas: Finally, we specify how many pods (replicas of our container) we want to run (set to 1 here).
See Kubernetes Deployments for more
3. The Service
Since pods are ephemeral and their IPs change, we need a stable point of contact to reach our application. The Service has its own unique name and acts as a router that takes in requests from the Ingress and sends them to the right pod. It also functions as a load balancer by distributing traffic across any pods that match its selector. In more complex setups, you'll often have multiple services handling different internal communications.
Here is how the service is defined:
apiVersion: v1
kind: Service
metadata:
  name: website-service
  namespace: website-namespace
spec:
  selector:
    app: website-pod
  ports:
    - port: 80
targetPort: 80Port Mapping: We map the external port (80) to the container's targetPort (80).
It might look weird to map port 80 to 80, but this translation is very useful in some situations. On Linux, binding to ports below 1024 (like 80 or 443) usually requires root privileges. By using a Service, we can accept public traffic on port 80 and forward it to a safe, non-privileged port (like 8080) inside the container if needed.
see Kubernetes Services for more
4. The Ingress
The Ingress is an HTTP router (a submodule under networking.k8s.io/v1) that defines which domain names lead to which services. Like the other resources, it has a specific name, and you can define several of them to manage different domains or entry points.
Here is how the ingress is defined:
apiVersion: networking.k8s.io/v1
kind: Ingress
metadata:
  name: website-ingress
  namespace: website-namespace
spec:
  rules:
    - host: simple-website.home.arpa
      http:
        paths:
          - path: /
            pathType: Prefix
            backend:
              service:
                name: website-service
                port:
number: 80Rules: We define that the host simple-website.home.arpa leads to our website-service.
Paths: The / path with pathType: Prefix means anything under that domain will be routed to the same service. This includes simple-website.home.arpa/about or simple-website.home.arpa/blog/article-1.
See Kubernetes Ingress for more
Here is a diagram to show how these different components interact:
The full configuration
By concatenating all these blocks using the --- separator, we get our final configuration file. While you can keep them as separate files, combining them into a single config.yaml is often easier for small projects. As things get more complex, you might eventually want to split them back up.
Save the following content into a file named config.yaml (don't forget to update the image path with your username):
apiVersion: v1
kind: Namespace
metadata:
  name: website-namespace
---
apiVersion: apps/v1
kind: Deployment
metadata:
  name: website
  namespace: website-namespace
spec:
  replicas: 1
  selector:
    matchLabels:
      app: website-pod
  template:
    metadata:
      labels:
        app: website-pod
    spec:
      containers:
        - name: website-app
          image: ghcr.io/<YOUR_GITHUB_USERNAME>/simple-app:latest
---
apiVersion: v1
kind: Service
metadata:
  name: website-service
  namespace: website-namespace
spec:
  selector:
    app: website-pod
  ports:
    - port: 80
      targetPort: 80
---
apiVersion: networking.k8s.io/v1
kind: Ingress
metadata:
  name: website-ingress
  namespace: website-namespace
spec:
  rules:
    - host: simple-website.home.arpa
      http:
        paths:
          - path: /
            pathType: Prefix
            backend:
              service:
                name: website-service
                port:
number: 80Step 5 : How to deploy your application to Kubernetes
Once your image is pushed and K3s is configured, apply the configuration:
kubectl apply -f config.yamlYou can check if everything is running correctly by listing the resources in our namespace. Since we used website-namespace, we need to specify it with the -n flag:
# Check all resources (pods, services, deployments)
kubectl get all -n website-namespace

# Specifically check the ingress
kubectl get ingress -n website-namespaceWait a few seconds for the pod to be "Running". If you see ImagePullBackOff, double-check your registry credentials in Step 3!
If you followed the previous article on Pi-Hole and forwarded *.home.arpa domains to your Pi, your website should now be live at simple-website.home.arpa.

You can find the complete code here: github.com/Local-pie/simple-app
In the next article, we'll see how to deploy your website to the internet.

Judicael Poumay (Ph.D.)
Follow me on LinkedIn for weekly content Judicaël Poumay
As an independent AI researcher/developer specialized in Natural Language Processing (NLP), I have a comprehensive expertise in the development and integration of AI systems, as well as data analysis.
Is your company looking to integrate AI solutions, analyze data, or strengthen its back-end development? Contact me!
Related Articles
GitHub Actions for CI/CD: A Complete Guide
A comprehensive guide to building continuous integration and deployment pipelines using GitHub Actions. Learn how to configure workflows, build container images, and safely automate deployments to Kubernetes.
How to self-host a container registry on K3s with Zot
Learn how to self-host a private, production-ready container registry on K3s using Zot. This guide covers Helm installation, CI/CD integration, image signing with Cosign, and vulnerability scanning with Trivy.
How to install Kubernetes K3s on a Raspberry Pi 5
Learn how to install and configure K3s, a lightweight Kubernetes distribution, on a Raspberry Pi 5. This guide covers enabling cgroups, setting up the cluster, and configuring remote access with kubectl.