How to expose a home Kubernetes cluster to the internet with DDNS and HTTPS
In the previous chapter, we deployed a small application locally on Kubernetes. It worked inside the home network, but so far it's not reachable from the public internet.
In order to do that, we need a few pieces:
- a domain name, for example:
my-website.com; - DNS records pointing that domain to our public IP address;
- Dynamic DNS, because a home public IP address can change over time;
- router port forwarding, so internet traffic reaches the Raspberry Pi;
- Kubernetes Ingress rules, so Traefik knows which app should receive which hostname;
- HTTPS certificates, so the website is served securely.
Don't worry if this seems like a lot; most of it is relatively easy to do and I will explain it all in this article.
Step 1: Get a domain name
To make a website accessible from anywhere in the world, we need a domain name. For example, this blog uses thethoughtprocess.xyz.
A domain name is the human-friendly name people type in their browser. Without it, people would need to use your public IP address directly, which is inconvenient and can change over time. And actually with Kubernetes is not even possible since the ingress expects a domain name.
You can buy a domain name from many registrars, such as Cloudflare, OVH, Namecheap, or GoDaddy. I personally like Cloudflare because the Cloudflare DNS interface is clear and they provide many useful features that are available for free for small websites.
In Cloudflare, after creating an account, you can go to Domains -> Registrations:
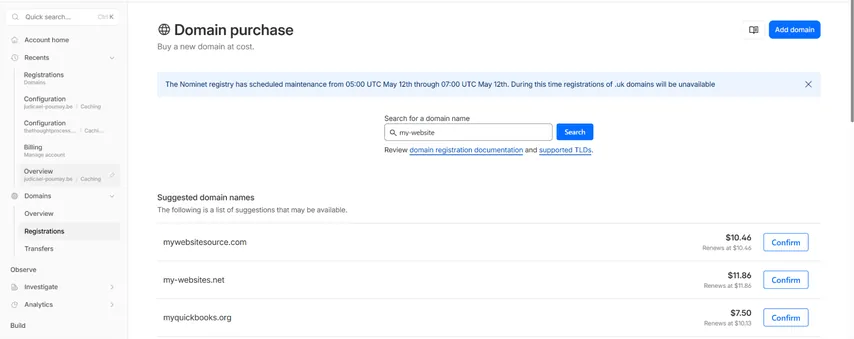
Then search for the domain you want.
Be aware that prices can vary a lot depending on the domain extension. A .com, .be, .io, or .dev domain can have very different prices. Some domains are cheap for the first year but more expensive on renewal, so always check the renewal price too.
Step 2: Create DNS records
Once you own a domain, you need to tell the internet which server it corresponds to. That is the role of DNS.
DNS is like the phonebook of the internet. When someone types www.my-website.com in their browser, their computer asks DNS servers: "What IP address corresponds to this hostname?" The answer is usually an IPv4 address. For example: 90.50.77.122.
This means that when a browser wants to visit www.my-website.com, it connects to the server at 90.50.77.122.
To find your current public IPv4 address from the Raspberry Pi, you can run:
curl -4 ifconfig.meThen, in Cloudflare, go to your domain and open DNS then Records.
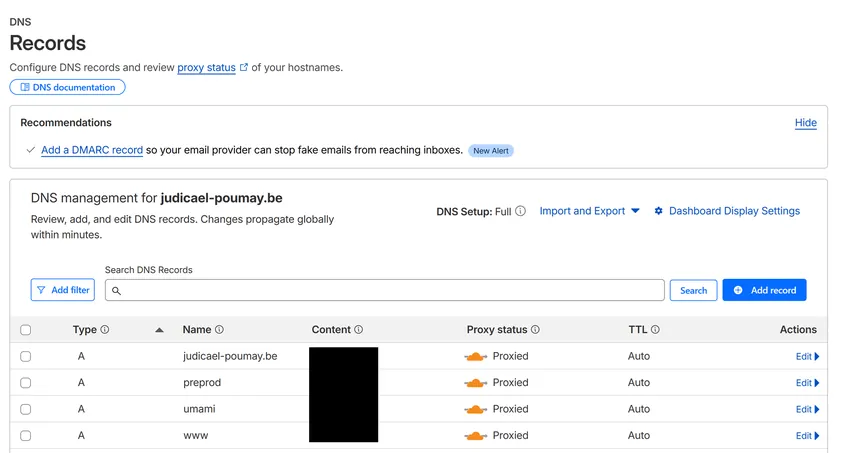
Click add record and create an A record like this (A record are for linking a domain to IPv4) :
Type: A
Name: www
IPv4 address: your-public-ip
Proxy status: Yes
TTL: AutoIf you also want the root domain to work, for example my-website.com without www, add another A record:
Type: A
Name: @
IPv4 address: your-public-ip
Proxy status: Yes
TTL: AutoTTL means Time To Live. It tells browsers and DNS resolvers how long they can cache this DNS record before asking Cloudflare again. This matters because your public IP may change later as we will see.
Proxy status enabled means requests go through Cloudflare before reaching your server. This is useful because Cloudflare can provide HTTPS, caching, and protection against some malicious traffic before it reaches your home network.
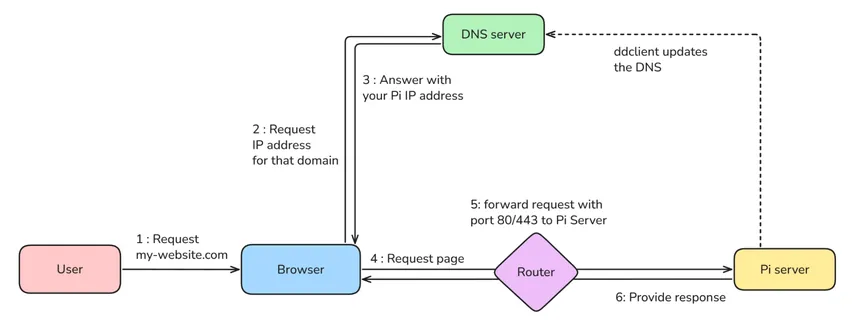
At this point, DNS knows where your domain should go. However, there is still a problem: on most home internet connections, your public IP address is not guaranteed to stay the same.
Thus, we need Dynamic DNS.
Step 3: Set up Dynamic DNS
Most home internet connections do not have a fixed public IP address. Your ISP can change it at any time.
That creates a problem because users access your site through www.my-website.com and the DNS points that hostname to your current public IP. However, if your ISP changes your IP address, the DNS record becomes outdated, visitors are sent to the wrong address and will get an error.
Dynamic DNS solves this by automatically updating the DNS record whenever your public IP changes. For this, we will use ddclient. Its job is to regularly check your current public IP address, and update your DNS provider if the IP changed.
You can run ddclient inside Kubernetes, but I prefer running it directly on the Raspberry Pi. Dynamic DNS is part of the basic networking layer of the server. It should keep working even if Kubernetes is being upgraded, restarted, or misconfigured.
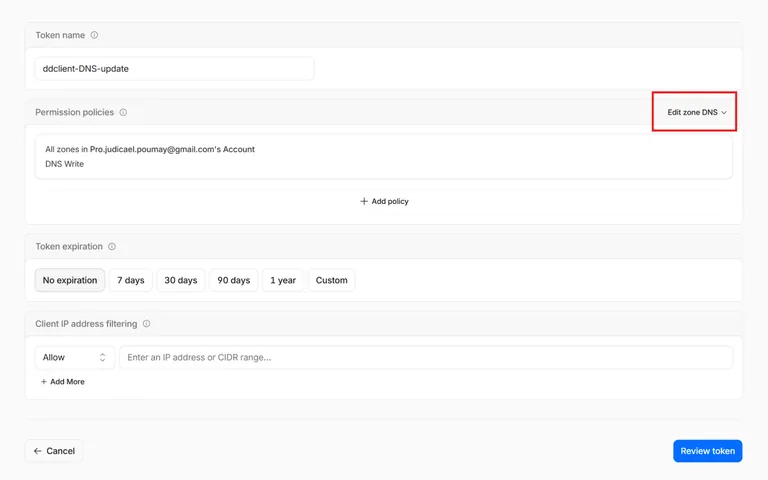
Create a Cloudflare API token
Before Installing ddclient, we need to create a Cloudflare API token. Indeed, we will have to contact cloudflare for DNS updates so we need to get the permission to do so.
In Cloudflare:
- Go Manage Account -> Account API Tokens.
- Click Create Token.
- Search for the "Edit DNS Zone" template
- You can also restrict the token to the specific domain you want to update.
- Create the token.
- Copy it immediately, because Cloudflare only shows it once.
Install ddclient on the Raspberry Pi
Now we can install ddclient with :
sudo apt update
sudo apt install ddclientThen edit the configuration file:
sudo nano /etc/ddclient.confHere is an example of a Cloudflare configuration:
daemon=300
syslog=yes
ssl=yes
use=web, web=ipify-ipv4

protocol=cloudflare
zone=my-website.com
ttl=1
login=token
password=YOUR_CLOUDFLARE_API_TOKEN
www.my-website.com
my-website.comLet me explain a few things :
daemon=300means ddclient checks your public IP every 300 seconds.ssl=yesmeans ddclient talks to Cloudflare over HTTPS.protocol=cloudflareobviously this informs ddclient that the upstream DNS server is cloudflare but you could use another registrar if they allow dynamic DNS.login=tokenmust literally be the wordtokenfor cloudflare this might change if you use something elsepassword=contains your Cloudflare API token- The last lines are the hostnames ddclient should update.
Once you have saved this configuration, restart ddclient:
sudo systemctl restart ddclientThen, check its status:
sudo systemctl status ddclientYou can also run it manually in debug mode:
sudo ddclient -daemon=0 -debug -verbose -noquietAt the end, you should see something like :
SUCCESS: thethoughtprocess.xyz: skipped: IP address was already set to x.x.x.xIf everything works, Cloudflare will now automatically receive your new public IP whenever it changes.
Step 4: Forward ports 80 and 443 on your router
Even if DNS is correct, internet traffic still reaches your router first. Your router must then know where to send that traffic inside your local network. This is called port forwarding.
For a public website, we need two ports:
- Port 80 for http
- Port 443 for https
In your router interface, look for a page called something like Port forwarding, Port opening, or NAT rules:

Create two rules pointing to the local IP address of your Raspberry Pi over the TCP protocol one for port 80 and one for port 443. You will be asked for the local and public port, in our setup they should be the same. This means:
- traffic arriving from the internet on port 80 goes to port 80 on the Raspberry Pi
- traffic arriving from the internet on port 443 goes to port 443 on the Raspberry Pi
Before doing this, make sure your Raspberry Pi has a static local IP address. Otherwise, your router might later assign it a different IP, and the port forwarding rule would stop working. If you haven't set that up, you can go back to Chapter 3 where we set up a static IP address for Pi-Hole.
At this point, if you open your domain in a browser, you may get an error or a 404 response. That's good news. It means the traffic reaches your cluster, but Kubernetes does not know what to serve. We are getting close.
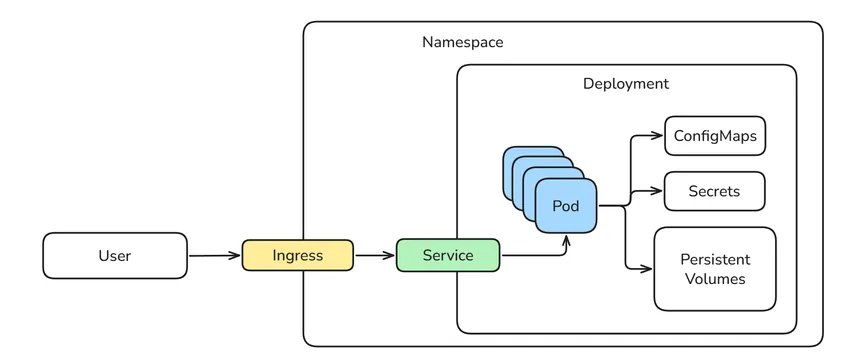
The request path now looks like this:
Step 5: Set up HTTPS with cert-manager and Let’s Encrypt
Before deploying the application properly, we should make it secure with HTTPS. That gives us two important things:
- encryption: no one between the user and your server cannot read the traffic
- authentication: the browser can verify that the server is allowed to serve this domain
With HTTPS, your website presents a TLS certificate to the browser. The browser checks that certificate to prove your server is the real owner of the domain and then creates an encrypted connection.
For this setup, we will use :
- Let’s Encrypt : a non-profit certificate authority that issues free TLS certificates
- cert-manager : a Kubernetes controller that requests, stores, and renews certificates automatically
Step 5.1: Install cert-manager
The job of cert-manager is to:
- request a certificate from Let’s Encrypt
- store the certificate inside Kubernetes as a Secret
- renew the certificate automatically before it expires
- let ingress use that certificate for HTTPS traffic
Installing helm
We will install cert-manager using Helm; a package manager for Kubernetes. It's similar to apt or pip, but for Kubernetes applications.
Install Helm on Linux:
curl https://raw.githubusercontent.com/helm/helm/main/scripts/get-helm-3 | bashInstall Helm on Windows:
winget install Helm.HelmThen update Helm:
helm repo add jetstack https://charts.jetstack.io
helm repo updateInstalling cert-manager
Install cert-manager:
helm install cert-manager jetstack/cert-manager \
  --namespace cert-manager \
  --create-namespace \
--set crds.enabled=trueCheck that the pods are running:
kubectl get pods -n cert-managerYou should see 3 pods which are running for cert-manager:
- The main cert-manager pod manages certificate creation and renewal.
- The webhook pod validates cert-manager resources when you apply them.
- The cainjector updates Kubernetes with the certificate needed so we can trust the cert-manager webhook. Together, they allow Kubernetes to safely request, validate, store, and renew TLS certificates automatically.
Creating a ClusterIssuer
At this point cert-manager still doesn't know who to ask for certificates. Thus, we need to create a ClusterIssuer. A small config file that we will load into Kubernetes.
Create a file called letsencrypt.yaml:
apiVersion: cert-manager.io/v1
kind: ClusterIssuer
metadata:
  name: letsencrypt-prod
spec:
  acme:
    email: [email protected]
    server: https://acme-v02.api.letsencrypt.org/directory
    privateKeySecretRef:
      name: letsencrypt-account-key
    solvers:
      - http01:
          ingress:
class: traefikThe important parts to understand are:
kind: ClusterIssuerindicates a type of Kubernetes resource used by cert-manager.metadata.name: letsencrypt-prodis the name we will reference later from our Ingress.emailis used by Let’s Encrypt to identify your account and send important notifications.serverpoints to the Let’s Encrypt production API used by cert-manager to request certificates.privateKeySecretReftells cert-manager where to store the private key for your Let’s Encrypt account.solvers.http01means we use the HTTP-01 challenge. I will explain this later.ingress.class: traefik tells cert-manager to create the temporary challenge route using Traefik. The ingress controller for k3s.
Apply it with:
kubectl apply -f letsencrypt.yamlCheck it:
kubectl get clusterissuer
kubectl describe clusterissuer letsencrypt-prodHow does Kubernetes know about this clusterissuer? When we installed cert-manager we used the option --set crds.enabled=true. This tells Kubernetes that new resource types exist, and users can create them with kubectl apply. This includes ClusterIssuer but also Certificate and more.
How the HTTP-01 challenge works
Here is a small technical detail if you are interested in learning how this works.
Let’s Encrypt does not give a certificate to anyone who asks for one. You first need to prove that you control the domain. With the HTTP-01 challenge, Let’s Encrypt checks a temporary URL on your server:
http://your-domain.com/.well-known/acme-challenge/...cert-manager creates this temporary endpoint inside the cluster and informs Let’s Encrypt who then calls it from the public internet. If Let’s Encrypt receives the expected token, the domain is validated and the certificate can be issued. This is why port 80 must be reachable from the internet, even if your final website uses only HTTPS.
Step 5.2: Add HTTPS to the Ingress
We can now create certificates, time to configure the application Ingress for secure web connections. If you have read the previous chapter about deploying a simple app to Kubernetes, you should have a basic grasp of the following yaml which defines the ingress. Can you spot the differences?
apiVersion: networking.k8s.io/v1
kind: Ingress
metadata:
  name: mytlswebsite-ingress
  namespace: mytlswebsite-namespace
  annotations:
    cert-manager.io/cluster-issuer: letsencrypt-prod
    traefik.ingress.kubernetes.io/router.entrypoints: websecure
spec:
  rules:
    - host: www.my-website.com
      http:
        paths:
          - path: /
            pathType: Prefix
            backend:
              service:
                name: mytlswebsite-service
                port:
                  number: 80

    - host: my-website.com
      http:
        paths:
          - path: /
            pathType: Prefix
            backend:
              service:
                name: mytlswebsite-service
                port:
                  number: 80
    - host: my-website.home.arpa
      http:
        paths:
          - path: /
            pathType: Prefix
            backend:
              service:
                name: mytlswebsite-service
                port:
                  number: 80

  tls:
    - hosts:
        - www.my-website.com
        - my-website.com
        - my-website.home.arpa
secretName: mywebsite-tlsCompared to the local Ingress from the previous chapter, we added a few important things :
rules:
- host: www.my-website.comThis tells Kubernetes that this Ingress applies also to requests for www.my-website.com and as you can see we also have rules for my-website.com and my-website.home.arpa.
cert-manager.io/cluster-issuer: letsencrypt-prodThis tells cert-manager to request a certificate using the letsencrypt-prod ClusterIssuer when we apply this ingress yaml.
traefik.ingress.kubernetes.io/router.entrypoints: websecureThis tells Traefik to expose this route on the HTTPS entrypoint, meaning port 443.
  tls:
    - hosts:
        - www.my-website.com
        - my-website.com
secretName: mywebsite-tlsThis tells Kubernetes that those hostnames should use TLS and that the certificate should be stored in a Secret called mywebsite-tls. You do not create this Secret manually. cert-manager creates it automatically after the certificate is issued.
If you have followed the previous article on deploying a simple app, you can then apply the Ingress:
kubectl apply -f ingress.yamlYou can download the complete code here with this new ingress: https://github.com/Local-pie/simple-tls-app
Step 5.3: Check the certificate
Check the Certificate resource:
kubectl get certificate -n mywebsiteIf it worked, you should see something like:
NAME            READY   SECRET          AGE
mywebsite-tls True mywebsite-tls 2mStep 6: Redirect HTTP to HTTPS
At this point, HTTPS should work, but HTTP may still be accessible.
You usually want users who visit:
http://www.my-website.comto be redirected automatically to the https version:
https://www.my-website.comWith Traefik in k3s, one option is to configure a global HTTP to HTTPS redirect.
Create:
traefik-https-redirect.yamlAdd:
apiVersion: helm.cattle.io/v1
kind: HelmChartConfig
metadata:
  name: traefik
  namespace: kube-system
spec:
  valuesContent: |-
    ports:
      web:
        redirectTo:
port: websecureApply it:
kubectl apply -f traefik-https-redirect.yamlCheck Traefik:
kubectl rollout status deployment traefik -n kube-systemThis applies HTTP to HTTPS redirection globally for Traefik.
If you prefer to apply redirects only to specific applications, you can use a Traefik Middleware instead.
Example:
apiVersion: traefik.io/v1alpha1
kind: Middleware
metadata:
  name: mytlswebsite-redirect-https
  namespace: mytlswebsite-namespace
spec:
  redirectScheme:
    scheme: https
permanent: trueThen attach it to the Ingress using a Traefik annotation traefik.ingress.kubernetes.io/router.middlewares like so :
apiVersion: networking.k8s.io/v1
kind: Ingress
metadata:
  name: mytlswebsite-ingress
  namespace: mytlswebsite-namespace
  annotations:
    cert-manager.io/cluster-issuer: letsencrypt-prod
    traefik.ingress.kubernetes.io/router.entrypoints: websecure
    traefik.ingress.kubernetes.io/router.middlewares: mytlswebsite-namespace-mytlswebsite-redirect-https@kubernetescrd
...For a small home cluster where some services are local and do not need https, you might prefer to use the middleware approach.
Step 7: Verify the full setup
Now verify the whole chain.
Check DNS
From your computer:
nslookup www.my-website.comIt should return your current public IP address or the cloudflare IP if you used cloudflare proxy. You can disable the proxy temporarily if you want to see if it resolve to your IP properly.
Check the Ingress
kubectl get ingress -AYou should see your hostname listed.
Check the certificate
kubectl get certificate -n mywebsiteYou want:
READY=TrueCheck the Secret
kubectl get secret mywebsite-tls -n mywebsiteThe Secret should exist in the same namespace as the Ingress.
Check the browser
Open:
https://www.my-website.comClick the small lock icon next to the URL and inspect the certificate.
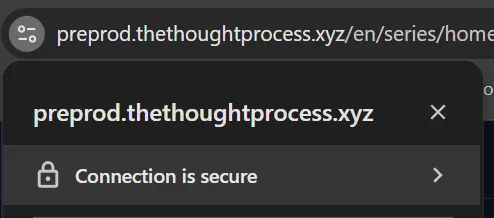
You should see that:
- the certificate is valid;
- it was issued for your domain;
- it was issued by Let’s Encrypt;
- the connection is using HTTPS.
This wasn't easy but we now have a public HTTPS website running from a Kubernetes cluster at home!
We did a a lot of things, let's summarize now :
- The domain name allow user to use human readable address
- DNS points the domain to your public IP
- Dynamic DNS keeps your public IP up to date
- port forwarding sends traffic from your router to the Raspberry Pi
- Traefik receives HTTP and HTTPS traffic
- Ingress routes hostnames to the right Kubernetes Services
- cert-manager automates TLS certificates
- Let’s Encrypt validates and signs the certificates
At this point, your home Kubernetes cluster is no longer only local. It can serve real websites on the public internet, with real HTTPS certificates, from your own Raspberry Pi.
Optional: Use Let’s Encrypt staging before production
When we created the ClusterIssuer, we used this address
server: https://acme-v02.api.letsencrypt.org/directoryThis is a production address that creates real certificates but if you fail too many times, they might rate limit you and you will have to wait to try again. When testing certificate solution like cert-manager, it is advised to use the staging url first:
server: https://acme-staging-v02.api.letsencrypt.org/directoryStaging behaves like production without the low rate limit. However, it creates test certificates that browsers do not trust.
This is useful because you can verify that DNS, port forwarding, Traefik, cert-manager, and the HTTP-01 challenge all work before asking for a real certificate.
Once the staging certificate is created successfully and the Certificate shows READY=True, switch back to the production url:
server: https://acme-v02.api.letsencrypt.org/directoryThen re-apply the ClusterIssuer.
For a clean setup, you can create two issuers:
letsencrypt-staging
letsencrypt-prodThen, create a separate ingress and namespace for staging purposes. You should have all of the details to do this by now.
Common issues
The certificate stays pending
If your certificate is not ready, you need to find out why cert-manager is failing. Run these commands to inspect the status:
First, check the certificate status:
kubectl get certificates -n mywebsiteYou want to see READY True. If it says False or stays pending, dig deeper by describing the certificate:
kubectl describe certificate mywebsite-tls -n mywebsiteLook at the Events section at the bottom of the output. It will tell you if it is waiting for an order or a challenge to complete.
Next, check if there is a pending challenge:
kubectl get challenges -n mywebsiteIf you see a challenge, describe it to see the exact error:
kubectl describe challenge -n mywebsiteLook at the Events and Status sections. Here is what to look for:
- ACME challenge errors: This often means Let's Encrypt cannot reach your server's temporary
.well-knownendpoint. - Domain resolution issues: Ensure your domain resolves to the correct public IP address.
- Connection refused or timeouts: Verify that port 80 is correctly forwarded on your router and your firewall isn't blocking the traffic.
Most of the time, the cause is one of these:
- DNS does not point to your current public IP;
- port 80 is not open;
- the router does not forward port 80 to the Raspberry Pi;
- the Ingress hostname is wrong;
- Traefik is not handling the Ingress;
- cert-manager cannot complete its internal self-check.
The cert-manager self-check fails
The way cert-manager and Let’s Encrypt work together is via the HTTP-01 challenge. This can cause some issues because cert-manager creates a temporary HTTP endpoint under:
http://your-domain.com/.well-known/acme-challenge/...Before asking Let’s Encrypt to validate it, cert-manager first checks from inside the cluster that this URL is reachable.
On some home networks, this can fail even if the website works from the public internet.
A common reason is that the router does not support NAT loopback, also called hairpin NAT. This means devices inside your LAN cannot access your public IP and be routed back inside the LAN.
For example:
Raspberry Pi -> public domain -> public IP -> router -> back to Raspberry PiSome routers support this. Some do not. If you use Cloudflare with the proxy enabled as we have set up in this article, you may not hit the classic NAT loopback problem, because internal requests to your domain go through Cloudflare instead of directly to your home public IP.
If you don't use Cloudflare, make the domain resolve internally to the local IP address of the server. If you use Pi-hole, you can add a local DNS override there. For example:
www.my-website.com -> 192.168.0.14Otherwise, you can configure the internal DNS server of k3s called coreDNS. Create this file coredns-custom.yaml:
apiVersion: v1
kind: ConfigMap
metadata:
  name: coredns-custom
  namespace: kube-system
data:
  mywebsite.override: |
    hosts {
      192.168.0.15 www.my-website.com
      fallthrough
} Don't forget to change 192.168.0.15 for your local IP and apply it:
kubectl apply -f coredns-custom.yaml
kubectl rollout restart deployment coredns -n kube-systemYou can test the DNS resolution from inside Kubernetes with:
kubectl run -it --rm dns-test \
  --image=busybox:1.36 \
  --restart=Never \
-- nslookup www.my-website.comIf it returns your public IP, the cluster is using public DNS resolution.
If it returns your local Raspberry Pi IP, the cluster is using your internal override.

Judicael Poumay (Ph.D.)
Follow me on LinkedIn for weekly content Judicaël Poumay
As an independent AI researcher/developer specialized in Natural Language Processing (NLP), I have a comprehensive expertise in the development and integration of AI systems, as well as data analysis.
Is your company looking to integrate AI solutions, analyze data, or strengthen its back-end development? Contact me!
Related Articles
How to deploy a simple application to Kubernetes
Learn how to deploy a basic HTML application to your local Kubernetes cluster. This guide covers building a Docker image, pushing to GitHub Container Registry, and writing essential YAML configurations.
How to self-host a container registry on K3s with Zot
Learn how to self-host a private, production-ready container registry on K3s using Zot. This guide covers Helm installation, CI/CD integration, image signing with Cosign, and vulnerability scanning with Trivy.
How to install Kubernetes K3s on a Raspberry Pi 5
Learn how to install and configure K3s, a lightweight Kubernetes distribution, on a Raspberry Pi 5. This guide covers enabling cgroups, setting up the cluster, and configuring remote access with kubectl.