How to self-host a container registry on K3s with Zot
Self-hosting a container registry is one of the easiest ways to make a homelab Kubernetes setup faster, more private, and closer to a real production environment. Instead of pulling every image from Docker Hub or GitHub Container Registry, you can run your own registry directly inside K3s and keep your images close to where they are built and deployed.
In this guide, I’ll show you how to self-host a container registry with Zot on K3s, including:
- Helm installation
- Local image pushes & Kubernetes pulls
- CI/CD integration
- Image signing with Cosign
- Vulnerability scanning with Trivy
- Retention policies
- Authentication
- And production-grade security improvements.
The goal is not just to install a registry, but to build a practical private container registry setup that is lightweight enough for a Raspberry Pi cluster, while still teaching the same concepts used in real production platforms.
Why self-host a container registry?
The main reason why I decided to self-host my container registry is that it leads to faster pushes and pulls which can lead to dramatically faster CI/CD pipelines. In my case, this led to a 2x speed increase as I don't have to go over the network to retrieve my containers. I'm already building them and using them on the same machine, so why not also host them there as well.
By storing and using local images, we also ensure greater security and privacy. Another benefit is that we don't rely on an external provider and thus we are not subject to rate limits, storage limits or external service outages (looking at you GitHub).
Nonetheless, self-hosting may not be the right fit for you. It requires some work to setup and maintain. It also won't be accessible globally unless you make it but this will require a more complex setup to ensure proper security.
However, if you wish to learn more about Kubernetes and container registry, self-hosting is a great way to do that.
What are our options for self-hosting a registry?
There are many solutions for self-hosting, each of them with their own pros & cons.
Docker Registry is the simplest option: it is lightweight, well-known, and easy to run if all you need is “push image, pull image.” The downside is that it is very barebones. It is good for minimal setups, but you quickly feel its limits once you want proper operations around your images.
Harbor is the opposite: it is a full container registry platform. It gives you a UI, projects, users, RBAC, vulnerability scanning, replication, retention policies, robot accounts, audit logs, and enterprise-style governance. The downside is that it is heavy for a homelab or small k3s cluster. It has more moving parts, more resource usage, more configuration, and more maintenance. Great for teams; overkill for one person.
Gitea/Forgejo is convenient because it can host code and container images in the same place. The tradeoff is that the registry is not the main product. It is good enough for simple workflows, but it is less specialized than Harbor or Zot for registry-specific features.
Zot is a strong middle ground for self-hosting. It is lightweight, OCI-native, modern, and more focused than Docker Registry without becoming as heavy as Harbor. It is written in Go which makes it really fast and has a basic UI. It fits well with homelabs, edge clusters, k3s, ARM devices, and private image workflows. The downside is that it is less familiar than Docker Registry or Harbor and it has a smaller ecosystem. It is a good choice when you want a real registry without running a full enterprise platform.
In my setup and this article, we will use Zot because the lightweight aspect is very appealing without being too barebone.
How to install Zot
As any good Kubernetes user, we will install Zot via Helm. First, we will need a small configuration file to enable the UI, persistence, and ingress. Let's call it "values.yaml" :
replicaCount: 1

resources:
  requests:
    cpu: 5m
  limits:
    cpu: 200m
    memory: 256Mi

image:
  repository: ghcr.io/project-zot/zot-linux-arm64
  tag: "v2.1.17"
  pullPolicy: IfNotPresent

service:
  type: ClusterIP
  port: 5000

ingress:
  enabled: true
  className: traefik
  hosts:
    - host: zot.home.arpa
      paths:
        - path: /
          pathType: Prefix

persistence:
  enabled: true
  storageClass: "local-path"
  size: 10Gi

mountConfig: true
configFiles:
  config.json: |-
    {
      "storage": {
        "rootDirectory": "/var/lib/registry"
      },
      "http": {
        "address": "0.0.0.0",
        "port": "5000",
        "externalURL": "http://zot.home.arpa"
      },
      "log": {
        "level": "debug"
      },
      "sync": {
        "enable": true,
        "registries": [
          {
            "urls": ["https://registry-1.docker.io"],
            "onDemand": true,
            "content": [{ "prefix": "/**" }]
          }
        ]
      }
}Note that, of course, we will need to create a persistent volume to store these containers. In this case, we use k3s local-path and assign 10Gi. We also further define where this storage is located with the zot config "storage". This might be different depending on your setup.
When using local-path storage on a Raspberry Pi, ensure your rootDirectory in the Zot config matches where the PVC is mounted. In this setup, we mapped it to /var/lib/registry to keep things organized and separate from the default system registry paths.
In this config, I have also defined zot as a pull-through cache/mirror. Every time a fresh build requires a basic image (like node:20 or python:3.11), it normally pulls from Docker Hub. The parameter "sync" configures Zot to act as a proxy cache for Docker Hub so those images are pulled once and then stored in Zot for next time, ensuring faster builds and lower bandwidth usage. You also avoid those pesky rate limits from Docker Hub.
Since this is part of the overall infrastructure of your cluster, I suggest you store this configuration file in some repository. I have a repo called "pie-k3s" that holds many config files and deployment scripts for many aspects of my infrastructure.
Once you are ready, install it with Helm :
helm repo add zot https://zotregistry.dev/helm-charts
helm install zot zot/zot -n zot --create-namespace -f values.yaml
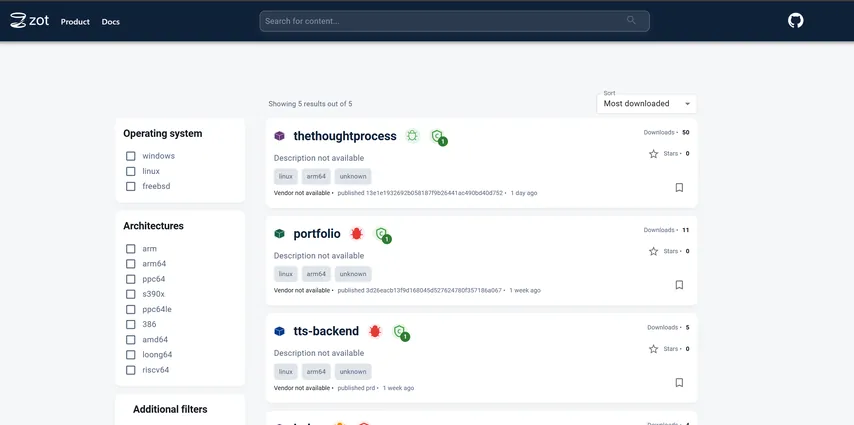
If you have already setup .home.arpa local DNS forwarding as we did in a previous article, you should be able to Visit http://zot.home.arpa to access the UI. Our images will be shown there once we push them.
How to configure Docker and K3s for Zot
Local Docker Configuration
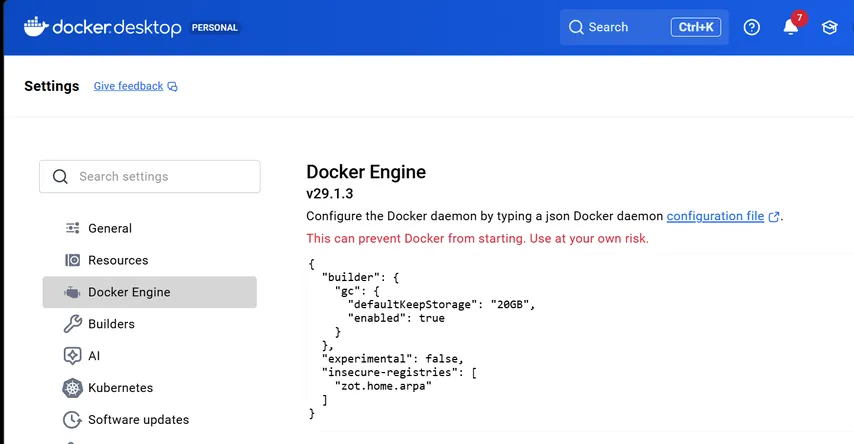
Since I have decided to set up zot as a local service only, https is not configured. Thus, to push images with docker from your development machine, you need to add zot as an insecure registry. Add this to your "/etc/docker/daemon.json" (or Docker Desktop settings):
{
  "insecure-registries": ["zot.home.arpa"]
}
For example :
You can then push an image like so :
docker tag my-app:latest zot.home.arpa/my-app:latest
docker push zot.home.arpa/my-app:latest
K3s Configuration
Now, we need to tell k3s to use zot for pulling images as well as act as a pull through proxy for docker. Append this to /etc/rancher/k3s/registries.yaml:
mirrors:
  "zot.home.arpa":
    endpoint:
      - "http://zot.home.arpa"
  "docker.io":
    endpoint:
- "http://zot.home.arpa"Then restart k3s with
sudo systemctl restart k3s
Now we are ready to use Zot in our k3s deployments.
Using Zot in CI/CD workflows
Since Zot is self-hosted inside the cluster, it makes sense to use a self-hosted runner as well. Otherwise, your CI/CD pipeline still has to push images from GitHub’s hosted runners over the public internet. This would remove much of the speed benefit of keeping the registry local and makes the setup more complex. I will explain how to setup a self-hosted runner in the next article.
Inside our Git workflows, we can configure Buildx to use zot like so :
- name: Set up Docker Buildx
  uses: docker/setup-buildx-action@v3
  with:
    buildkitd-config-inline: |
      [registry."zot.home.arpa"]
http = trueAnd tag your images with zot.home.arpa/... for the push.
      - name: Build and push
        uses: docker/build-push-action@v5
        with:
          context: .
          network: host
          platforms: linux/arm64
          push: true
          tags: |
            zot.home.arpa/my-app:latest
		  cache-from: type=registry,ref=zot.home.arpa/my-app:buildcache
cache-to: type=registry,ref=zot.home.arpa/my-app:buildcache,mode=maxDon't forget, using latest isn't a good idea for real production-grade applications. This is just an example.
Since we enabled caching when installing Zot, we also take advantage of it by adding the cache-to and cache-from parameter to the build step.
Signing images
Why should you sign images
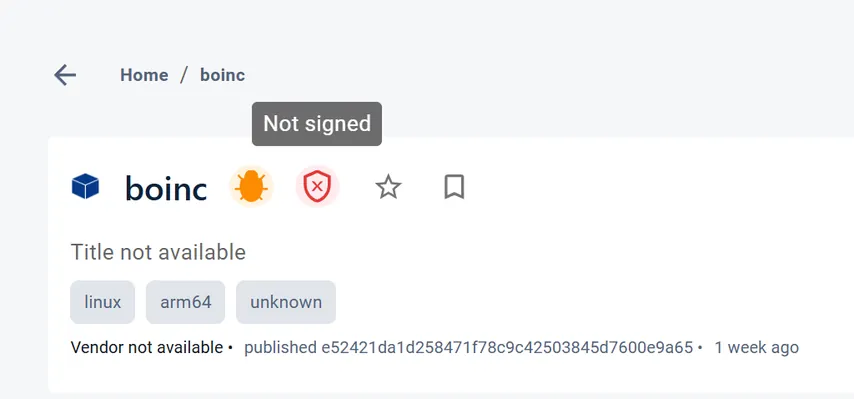
When you look at the Zot UI, you might notice your images are marked as "not signed". Signing images is a critical part of supply chain security, proving that the image running in your cluster was built by your CI/CD pipeline and hasn't been tampered with. This is important to ensure malicious actors can't run images on your cluster that you haven't signed.
Create public-private keys with cosign
First, locally download cosign at https://github.com/sigstore/cosign/releases and select the right executable based on your OS and architecture. For example cosign-windows-amd64.exe.
Then generate keys, you will be asked to type a password, keep it close we will need it :
cosign-windows-amd64.exe generate-key-pair
This will create two files :
cosign.key   # private key: keep secret
cosign.pub   # public key: safe to share
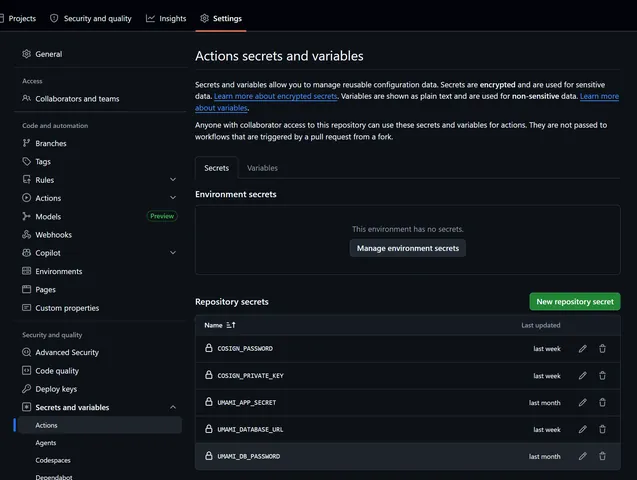
In your GitHub repository settings, create a secret called COSIGN_PRIVATE_KEY and COSIGN_PASSWORD and paste the contents of cosign.key into the first and your password in the second.
While it is also possible to use keyless signing with Cosign, it relies on external services to issue and verify certificates. For a private homelab, a traditional key pair is often simpler because it works entirely offline.
Signing images with cosign
First, ensure the trust extension is enabled in your values.yaml for Zot. Then redeploy Zot with the new config file with trust enabled :
configFiles:
  config.json: |-
    {
      "extensions": {
        "trust": {
          "enable": true,
          "cosign": true
        }
      }
}Then, upload your cosign.pub key directly to Zot's API using this command. Zot will securely store this key inside its storage directory :
curl --data-binary @cosign.pub "http://zot.home.arpa/v2/_zot/ext/cosign"


Invoke-WebRequest `
  -Uri "http://zot.home.arpa/v2/_zot/ext/cosign" `
  -Method Post `
  -InFile "cosign.pub" `
  -ContentType "application/octet-stream"
Finally, we are ready to sign our images. Add these steps after you have pushed your image to zot:
- name: Install Cosign
  uses: sigstore/[email protected]

- name: Sign image with Cosign
  env:
    COSIGN_PRIVATE_KEY: ${{ secrets.COSIGN_PRIVATE_KEY }}
    COSIGN_PASSWORD: ${{ secrets.COSIGN_PASSWORD }}
        run: |
            export TLS_INSECURE_SKIP_VERIFY=true
cosign sign --yes --key env://COSIGN_PRIVATE_KEY zot.home.arpa/my-app:${{ github.sha }}Warning: We are using
TLS_INSECURE_SKIP_VERIFY=truebecause our Zot registry is served over HTTP internally. In a production enterprise environment utilizing HTTPS/TLS, you should never skip verification. Ensure your registry has valid certificates instead.
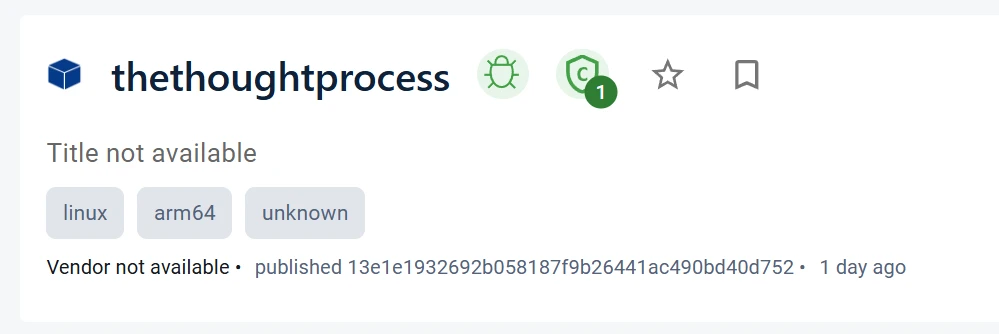
From now on, whenever zot parses a new signature pushed by Cosign, it will verify it against your uploaded public key and proudly display your image as Trusted in the UI!
Ensure only signed images are deployed with Kyverno
At this point, Zot can verify and display image signatures, but Kubernetes will still allow the deployment of unsigned images. To actually enforce supply chain security, we need an admission controller that checks image signatures before a Pod is even created.
For this, we will use Kyverno which is lightweight, easy to install, and integrates directly with Cosign signatures.
Installing Kyverno
Add the Kyverno Helm repository and install it:
helm repo add kyverno https://kyverno.github.io/kyverno/
helm repo update

kubectl create namespace kyverno

helm install kyverno kyverno/kyverno \
--namespace kyvernoVerify that Kyverno is running:
kubectl get pods -n kyvernoCreating an image verification policy
Create a file called verify-images.yaml and save it in your infrastructure repository :
apiVersion: kyverno.io/v1
kind: ClusterPolicy
metadata:
  name: verify-zot-images
spec:
  validationFailureAction: Enforce
  background: false

  rules:
    - name: verify-signatures
      match:
        any:
          - resources:
              kinds:
                - Pod

      verifyImages:
        - imageReferences:
            - "zot.home.arpa/*"
          mutateDigest: true
          verifyDigest: true
          attestors:
            - entries:
                - keys:
                    publicKeys: |-
                      -----BEGIN PUBLIC KEY-----
                      PASTE_YOUR_COSIGN_PUBLIC_KEY_HERE
-----END PUBLIC KEY-----Replace the public key with the contents of your cosign.pub file. You could automate this, I'll leave that as an exercise for the reader.
Finally, apply the policy:
kubectl apply -f verify-images.yamlTesting the policy
Deploying a correctly signed image should work normally.
However, if you attempt to deploy an unsigned image:
containers:
  - name: app
image: zot.home.arpa/my-app:unsignedKyverno will reject the deployment and Kubernetes will return an error similar to:
failed policy verification:
image signature verification failedWith Kyverno enforcing signatures, Kubernetes itself refuses to run images that are unsigned or signed with an untrusted key.
Verify by digest
Before wrapping up Kyverno, let's talk about digests.
Tags like these are mutable:
image: zot.home.arpa/my-app:latest
Today latest may point to safe image A. Tomorrow someone can move latest to image B. Even if Kyverno verifies the tag at admission time, the tag itself is not a stable identity.
A digest is immutable:
image: zot.home.arpa/my-app@sha256:abc123...
That points to one exact image manifest that cannot change.
So in Kyverno, you usually want:
mutateDigest: true # force k3s to use digest by mutating tags to resolved digest
verifyDigest: true # requires the final image reference to include a digest.
So this:
zot.home.arpa/my-app:prd-latest
Automatically becomes a digest once deployed :
zot.home.arpa/my-app@sha256:abc123...
That makes the deployment reproducible and prevents tag-moving attacks.
Enabling Vulnerability Scanning (CVEs)
An image might be signed but it doesn't mean it is safe. Software vulnerabilities might provide malicious actors with entry points to attack your cluster. To increase your security, you need to also scan for vulnerabilities.
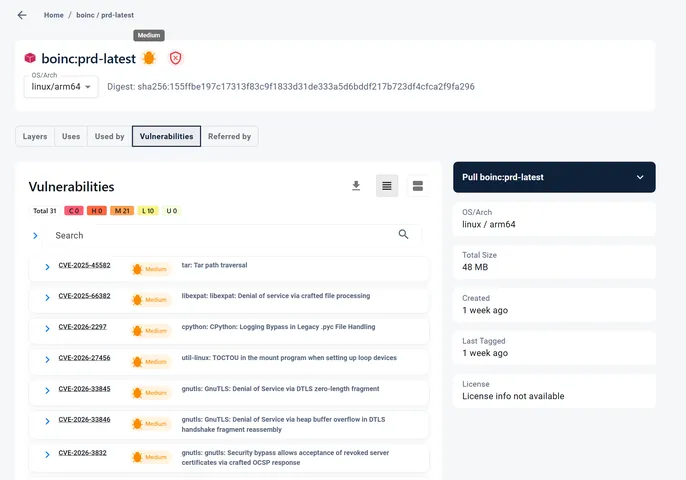
Zot has a built-in integration with Trivy, allowing it to automatically scan all of your container images for security vulnerabilities (CVEs) and display the results right in the UI.
How to enable vulnerability scanning
To enable CVE scanning, you need to add the cve block inside the search extension in your values.yaml file:
configFiles:
  config.json: |-
    {
      "extensions": {
        "search": {
          "enable": true,
          "cve": {
            "updateInterval": "2h"
          }
        }
      }
    }
That's it, it's that simple!
How it works
When you first enable CVE scanning (or restart Zot), Zot will immediately spin up a background task to download the latest vulnerability databases from ghcr.io/aquasecurity/trivy-db. This is a database of known vulnerabilities so new ones might not be found but it will find 99% of the ones that matter.
Because these databases can be quite large, it will take a few minutes to download. During this time, if you browse your images in the UI, you may see them marked as "failed to scan". This is perfectly normal! Just wait for the background download to finish, and Zot will automatically scan your images and display the severity badges.
Once done, you can have a look at your images and fix the vulnerabilities found.
Blocking Vulnerable Images Before They Reach Kubernetes
Just like signed images, Zot can show CVEs in the UI, but it does not automatically stop you from pushing or deploying vulnerable images. For that, you need a policy gate.
The simplest protection is to fail your CI/CD pipeline before pushing the image:
- name: Scan image with Trivy
  uses: aquasecurity/trivy-action@master
  with:
    image-ref: zot.home.arpa/my-app:${{ github.sha }}
    severity: MEDIUM,HIGH,CRITICAL
    exit-code: 1
ignore-unfixed: trueexit-code: 1 makes the workflow fail when matching vulnerabilities are found. By default, Trivy exits successfully even if it finds issues, so this flag is important.
Now we have a more secure production deployment pipeline. A complete example is shown at the end of the article :
- Build the image.
- Sign the image with Cosign.
- Push only signed images.
- Scan it with Trivy.
- Fail the pipeline if MEDIUM/HIGH/CRITICAL CVEs are found.
- Use Kyverno to reject unsigned images in Kubernetes.
Going Further
Storage, cleanup, and retention
Container registries can grow quickly. Every time you push a new tag, the registry stores manifests and layers. Layers are shared when possible, but old tags and unreferenced objects can still accumulate over time.
This is why you should monitor disk usage on the PVC of the registry. To check the current usage of a storage, Kubernetes doesn't provide any good tool (Weird right?). The best way I found is to use Prometheus and query it with:
100 *
kubelet_volume_stats_used_bytes{namespace="zot"}
/
kubelet_volume_stats_capacity_bytes{namespace="zot"}
Add a retention Policy
Once your registry starts accumulating hundreds of image tags, manually deleting old images becomes tedious. Zot supports retention policies that can automatically preserve important tags while removing older ones.
For example, you might want to:
- Always keep
latest,prd-latest, andpreprod-latest - Keep all versioned releases such as
v1.2.3 - Keep the 30 most recently pushed SHA tags
- Remove older SHA tags automatically
Such a retention policy can be configured directly in the values.yaml file of Zot:
{
  "storage": {
    "retention": {
      "dryRun": false,
      "delay": "24h",
      "policies": [
        {
          "repositories": ["**"],
          "keepTags": [
            {
              "patterns": ["latest", "prd-latest", "preprod-latest"]
            },
            {
              "patterns": ["v.*"]
            },
            {
              "mostRecentlyPushedCount": 30
            }
          ]
        }
      ]
    }
  }
}As with any automated cleanup system, start with a conservative policy and verify the results before enabling automatic deletion in production.
One particularly nice feature in recent Zot versions is a retention dry-run mode, which lets you preview what would be deleted before enabling the policy for real. Set "dryRun": true to test your policy before truly applying it. Otherwise, you might delete images that are currently deployed by accident.
Registry authentication and secrets
The current Zot setup we have done is public inside the local network and cluster: no password, no registry user, and no pull secret. That can be acceptable for a small homelab, but we can do better.
How to create secret Zot passwords with htpasswd
A better approach is to enable Zot authentication with htpasswd, store the credentials as a Kubernetes Secret, and only give Kubernetes the minimum credentials it needs to pull images.
Zot supports htpasswd, and bcrypt hashes can be generated with:
htpasswd -bBn ci-user "your-ci-password"
htpasswd -bBn cluster-user "your-cluster-password"In this scenario, I am creating two separate users:
ci-user: used by CI/CD to push imagescluster-user: used by Kubernetes to pull images
Do not commit real passwords or real htpasswd hashes to Git. Even hashed passwords can be brute-forced offline if your repository leaks. For production, use GitHub or Kubernetes Secrets.
For a simple K3s setup, you can create the Zot htpasswd secret directly in the cluster:
kubectl create secret generic zot-htpasswd \
  --namespace zot \
--from-file=htpasswd=./htpasswdThen configure Zot to mount that secret file and use it for authentication:
mountSecret: true
existingSecret: zot-htpasswdAnd in the Zot config:
"http": {
  "address": "0.0.0.0",
  "port": "5000",
  "externalURL": "http://zot.home.arpa",
  "auth": {
    "htpasswd": {
      "path": "/secret/htpasswd"
    }
  }
}How to configure K3s to use Zot passwords
Create a Kubernetes pull secret for workloads that need to pull from Zot:
kubectl create secret docker-registry zot-registry \
  --namespace my-app \
  --docker-server=zot.home.arpa \
  --docker-username=cluster-user \
--docker-password='your-cluster-password'Use that pull secret in your Deployment:
spec:
  template:
    spec:
      imagePullSecrets:
        - name: zot-registry
      containers:
        - name: my-app
image: zot.home.arpa/my-app:latestIf many workloads in the same namespace need to pull from Zot, you can attach the pull secret to the namespace’s default ServiceAccount:
kubectl patch serviceaccount default \
  --namespace my-app \
-p '{"imagePullSecrets":[{"name":"zot-registry"}]}'Now every Pod using the default ServiceAccount in that namespace can pull from Zot without repeating imagePullSecrets in every Deployment.
Fine-grained RBAC with Zot
You can also restrict what each Zot user can do. For example, ci-user can push and delete images, while cluster-user can only pull:
"accessControl": {
  "repositories": {
    "**": {
      "anonymousPolicy": [],
      "policies": [
        {
          "users": ["ci-user"],
          "actions": ["create", "read", "update", "delete"]
        },
        {
          "users": ["cluster-user"],
          "actions": ["read"]
        }
      ]
    }
  }
}For stronger isolation, create different pull users per namespace or application. For example:
blog-puller
portfolio-puller
monitoring-pullerThen restrict each user to only the repositories it needs. This prevents one compromised namespace from pulling every private image in your registry.
For a real production environment, you would typically move away from static
htpasswdand integrate the registry with a centralized identity provider such as LDAP, Active Directory, or OIDC. Moreover, Kubernetes secret encryption should be enabled and credentials rotated automatically.
External use of Zot over https
Also notice that we use Zot with http and not https. This is because it will only be used locally by our cluster and our self-hosted runner. If you use GitHub hosted runner, you will need to deploy Zot with https using a domain name. You might buy a domain for your cluster and use a subdomain for zot like https://zot.my-pie.com.
However, you will need to make sure it is secure. For a homelab or small private setup, I would avoid exposing Zot directly to the internet. If external access is needed, a Cloudflare Tunnel is usually safer and simpler than opening router ports, managing public IP changes, and exposing Traefik directly. You still get HTTPS and a real domain, but your home network does not need inbound ports open.
Back-up and disaster recovery process
To be resilient to outages or other disasters, back up the Zot PVC regularly. The registry is stateful; losing the PVC means losing images, signatures, metadata, and uploaded trust keys. You need to back up
- PVC
- Zot config
- htpasswd / secrets
- cosign public key / signing key management
You could also periodically test restoring the Zot PVC into a fresh namespace or cluster. A good disaster recovery process should always be tested regularly, not when a disaster comes.
Separate development and production registry
Finally, a small comment about environment separation. In real production environment, you will often see a separate container registry for production and non-production images. This helps with many things such as testing new retention policies, RBAC and more without affecting the production registry. Only once you are sure with the changes can you apply the same to production.
Once you have separate environment registries. Consider defining a promotion workflow where apps are built and tested in the non-production registry then promoted to the production registry.
Alerts and monitoring
There is much more we could do to improve this setup. For example adding alerts and monitoring for
- PVC usage > 80%
- Zot pod down
- 5xx errors
- failed pulls/pushes
- CVE DB update failures
- retention/GC failures
- certificate expiry if HTTPS But this is getting too long so I'll leave this to you.
Conclusion
That's it, I thought this was going to be a smaller article but it turns out container registries are complex. Especially if you want to make them safe and sound for real production use. If you have enabled all the safety mechanism, you should have something solid but for a homelab you might not need all of this. That's up to you.
Note that, this configuration is perfectly suitable for a single-node cluster. However, in a multi-node cluster, local-path storage ties the registry data to a single node, creating a single point of failure. For high availability, run multiple Zot replicas and use shared, fault-tolerant storage such as Longhorn so the registry remains available even if a node fails.
Annex: Complete CI/CD workflow example with Zot
Here is a complete GitHub Actions workflow using Zot as the local container registry.
This example:
- builds an ARM64 image
- pushes it to Zot
- uses Zot as a registry cache
- scans the image with Trivy
- signs the image with Cosign
- deploys it to K3s
name: Build and deploy with Zot

on:
  push:
    branches:
      - main

env:
  REGISTRY: zot.home.arpa
  IMAGE_NAME: my-app
  NAMESPACE: my-app

jobs:
  build-and-deploy:
    runs-on: self-hosted

    steps:
      - name: Checkout repository
        uses: actions/checkout@v4

      - name: Set image tags
        run: |
          echo "IMAGE=${REGISTRY}/${IMAGE_NAME}" >> $GITHUB_ENV
          echo "SHA_TAG=${REGISTRY}/${IMAGE_NAME}:${GITHUB_SHA}" >> $GITHUB_ENV
          echo "LATEST_TAG=${REGISTRY}/${IMAGE_NAME}:prd-latest" >> $GITHUB_ENV

      - name: Set up Docker Buildx
        uses: docker/setup-buildx-action@v3
        with:
          buildkitd-config-inline: |
            [registry."zot.home.arpa"]
              http = true

      - name: Login to Zot
        uses: docker/login-action@v3
        with:
          registry: zot.home.arpa
          username: ci-user
          password: ${{ secrets.ZOT_CI_PASSWORD }}

      - name: Build and push image
        uses: docker/build-push-action@v5
        with:
          context: .
          platforms: linux/arm64
          push: true
          tags: |
            ${{ env.SHA_TAG }}
            ${{ env.LATEST_TAG }}
          cache-from: type=registry,ref=zot.home.arpa/my-app:buildcache
          cache-to: type=registry,ref=zot.home.arpa/my-app:buildcache,mode=max

      - name: Scan image with Trivy
        uses: aquasecurity/trivy-action@master
        with:
          image-ref: ${{ env.SHA_TAG }}
          severity: MEDIUM,HIGH,CRITICAL
          exit-code: 1
          ignore-unfixed: true

      - name: Install Cosign
        uses: sigstore/[email protected]

      - name: Sign image with Cosign
        env:
          COSIGN_PRIVATE_KEY: ${{ secrets.COSIGN_PRIVATE_KEY }}
          COSIGN_PASSWORD: ${{ secrets.COSIGN_PASSWORD }}
        run: |
          cosign sign \
            --yes \
            --key env://COSIGN_PRIVATE_KEY \
            $SHA_TAG

      - name: Deploy to K3s
        run: |
          kubectl -n $NAMESPACE set image deployment/my-app \
            my-app=$SHA_TAG

          kubectl -n $NAMESPACE rollout status deployment/my-app
Judicael Poumay (Ph.D.)
Follow me on LinkedIn for weekly content Judicaël Poumay
As an independent AI researcher/developer specialized in Natural Language Processing (NLP), I have a comprehensive expertise in the development and integration of AI systems, as well as data analysis.
Is your company looking to integrate AI solutions, analyze data, or strengthen its back-end development? Contact me!
Related Articles
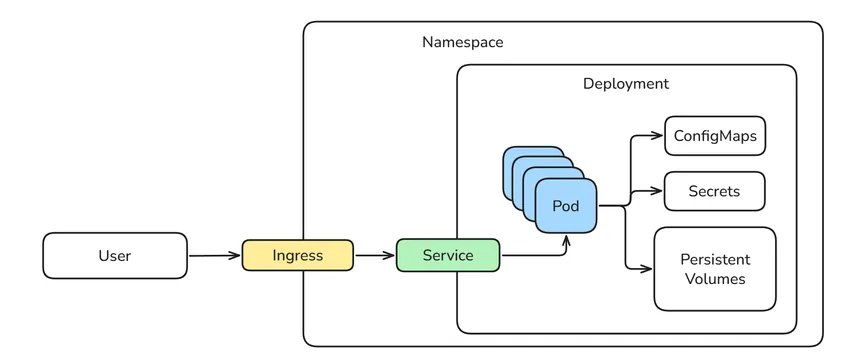
How to deploy a simple application to Kubernetes
Learn how to deploy a basic HTML application to your local Kubernetes cluster. This guide covers building a Docker image, pushing to GitHub Container Registry, and writing essential YAML configurations.
How to install Kubernetes K3s on a Raspberry Pi 5
Learn how to install and configure K3s, a lightweight Kubernetes distribution, on a Raspberry Pi 5. This guide covers enabling cgroups, setting up the cluster, and configuring remote access with kubectl.
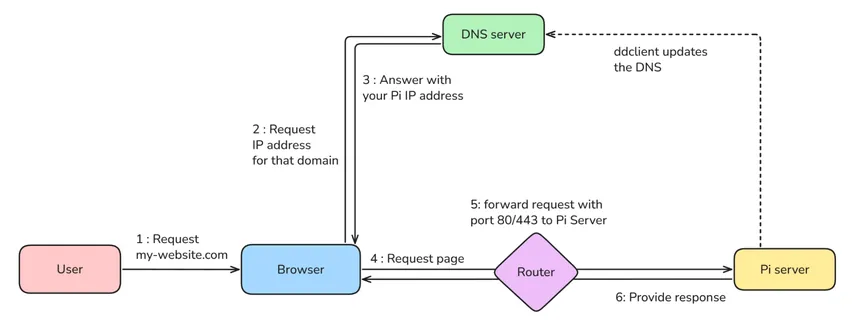
How to expose a home Kubernetes cluster to the internet with DDNS and HTTPS
Learn how to expose your home Kubernetes cluster to the public internet. This guide covers setting up Dynamic DNS, router port forwarding, and automatic HTTPS with cert-manager.